I decided that it was time that I made something for myself. I kept seeing great reviews for the Schoolhouse Tunic by Sew Liberated so I decided to give it a try. The pattern is very clear and easy to follow. I have become so accustomed to following tutorials with step by step pictures that I was a bit nervous about following a regular pattern. The drawings and explanations within the pattern are clear enough that I didn't get stuck at all. I thought that the sleeves might give me some trouble but they actually have a really clever way of doing those too so that you don't have to set them in. Yeah! So bottom line, would I recommend this pattern? Absolutely! Was the end result the best choice for my body type? Maybe not. From the front it doesn't look so bad. From the side, you might think Ringling Brothers was coming to town. Ugh! This pattern allows for either a shorter shirt length version or a longer tunic length. I tried the shorter version figuring that the longer version would look like a lot of fabric. Now I think that maybe the longer version might have laid a little flatter and not flared out so much.
My girls reaction to mommy in this shirt cracked me up. One tried to make me feel better when she could see that I wasn't so sure about it. She said, "I like it mommy. I think it looks good on you." The other one took one look at me and said, "Mommy, are you SURE you want to wear that?" Gotta love it!Sunday, June 27, 2010
Wednesday, June 23, 2010
Rainbow Experiment
The girls and their cousin did a quick rainbow experiment today. We found this idea on the Webkinz Jr. site. First, pour a little milk into a pie plate. Then add red, yellow and blue food coloring.
Finally, add a few drops of dish soap.
Viola, a rainbow!
Sunday, June 20, 2010
Happy Father's Day
We love you daddy!
The kids made some cute gifts for daddy this year. First the girls painted some wood frames and we added a couple of cute photos of all four kiddos.
Then came the messy project! We decided to paint a grilling apron for daddy. First, I divided up the main part of the apron with strips of freezer paper so that each kid could have a section. Then I let them have at it!
Then I printed out some pictures on freezer paper. I checked to make sure it would fit. Then I cut out the pictures with an exacto knife. I ironed it onto the apron and painted it.
It turned out really cute!
It turned out really cute!
Friday, June 18, 2010
Gift Ideas
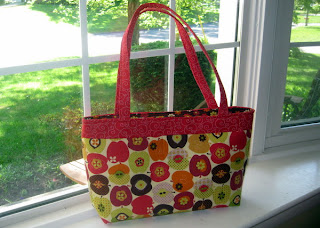
I just thought I would share some fun gifts I have made recently. The girls had a wonderful year of preschool and I really wanted to thank their teacher. I decided a while ago that I would make her a tote like the one I made my mom for Mother's Day. You can find the pattern here. I wanted some "teachery" type fabric without making it look juvenile. I happen upon this really cute apple fabric and I really think it turned out cute. Since I now have some experience installing snaps, I used one in this bag rather than the button closer I used for my mom's bag. I really prefer it.
Last weekend, my nieces had a dance recital and I wanted to make them something too. For my younger niece, I made a couple of fabric covered button pony tail holders. They are easy to make and the button cover kit can be found at Joann's.
Next time, I think that I would use two layers of fabric as the metal button showed through a little. For my older niece, I used this cute idea from V and Co. to make a fabric bracelet. I have to say that this very simple project took me a while for some reason. However, I do like the finished product and can see myself making more to coordinate with clothes I have made for myself and my girls.
Saturday, June 12, 2010
Reversible Pillowcase Dress
Last week, I found a great free tutorial on From an Igloo for a reversible shirt. It looked easy to make and really cute. So I thought that I would give it a try and started looking through my stash of fabrics. I came across some pillowcases that I purchased 3 years ago! When I first started sewing for my little girls one of the most basic beginner patterns was for a simple pillowcase dress. Well I guess I purchased these and never got around to doing anything with them. I thought that they would be perfect for this project.

I followed the tutorial but only worried about the strap and chest measurements. Other than that I just held the pillowcases up to my girls and thought it looked about right for width and length. I just cut a small strip off of the sewn together end to open it up. Then I cut off the cuff at the other end and used this fabric for the straps.


I didn't even have to sew the side seams for the dress because they were already done! I also decided to use bias tape for the bottom so that I didn't have to worry about folding up my hems exactly even. This project was super easy and my girls are thrilled that the dresses are reversible! Thanks so much to Christine for her great tutorial and please be sure to check out her blog.

I followed the tutorial but only worried about the strap and chest measurements. Other than that I just held the pillowcases up to my girls and thought it looked about right for width and length. I just cut a small strip off of the sewn together end to open it up. Then I cut off the cuff at the other end and used this fabric for the straps.


I didn't even have to sew the side seams for the dress because they were already done! I also decided to use bias tape for the bottom so that I didn't have to worry about folding up my hems exactly even. This project was super easy and my girls are thrilled that the dresses are reversible! Thanks so much to Christine for her great tutorial and please be sure to check out her blog.
Wednesday, June 9, 2010
Meet the Boys!

So my poor little boys haven't been represented at all on this blog. There just aren't that many tutorials out there for little boy items. I finally found something that I could make for them so here they are.

They are super cute and super sassy! "No mama, I didn't eat the blue sand and frankly I'm offended that you would think so."
I found this really great tutorial for freezer paper stencilling. First of all, I have to admit that I had never even heard of freezer paper but it is pretty cool stuff.

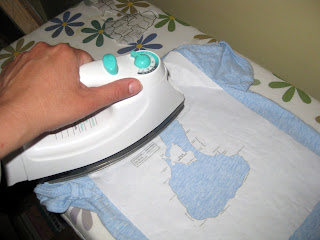
I cut the sheets of freezer paper to regular page size. Then I printed out my desired shape off the computer. In this case, I used a map of the island were we spend time in the summer. Be sure to print on the dull side of the paper. Next, use an exacto knife to cut out your shape.

With the shiny side of the freezer paper down, iron it onto your desired item of clothing. Then stick a piece of cardboard inside to prevent the paint from going through to the back.
Now paint 3 or 4 layers of matte fabric paint on your stencil. Allow for drying time between each layer. When dry, peel off the freezer paper. Finally, place a piece of fabric over the paint and iron to seal the paint. Viola! Thank you so much to Dana for this great tutorial. Be sure to check out her blog.
Monday, June 7, 2010
Tie Dye and Flip Flops

Around here, the girls and I try to plan messy, "big girl" activities for when baby brothers are having their nap.  Friday's nap time activity was tie dying. The girls had a really good time stirring the dye and helping me with the rubber bands. They love their finished shirts! We also threw some 1/2" elastic into the dye. Why? I really wanted to try an id
 ea suggested by Christine at From an Igloo. My girls love to wear flip flops but I dread it because they can't keep them on their feet. Well Christine came up with this great idea to add your own elastic straps. You just sew buttons onto the existing straps and then attach the elastic. Problem solved! For full details go to this link.
 Friday's nap time activity was tie dying. The girls had a really good time stirring the dye and helping me with the rubber bands. They love their finished shirts! We also threw some 1/2" elastic into the dye. Why? I really wanted to try an id
 ea suggested by Christine at From an Igloo. My girls love to wear flip flops but I dread it because they can't keep them on their feet. Well Christine came up with this great idea to add your own elastic straps. You just sew buttons onto the existing straps and then attach the elastic. Problem solved! For full details go to this link.
Labels:
Free Tutorials I've Found,
Just for fun
Thursday, June 3, 2010
New Sew Along
I've just found a new sew a long that I'm going to try. It is for a really cute quilted bag and accessories. I have never quilted before so it should be fun! Here is the link. Hopefully I can pick out my fabric in the next couple of days and get started. Thanks Kelly for the great Sew A Long!
Subscribe to:
Comments (Atom)


