Sunday, January 23, 2011

Kimberbell Kids Dolls

My little girls had their tonsils out last week.  I knew that they were going to need lots of rest and down time and I wanted them to have something cute and snuggly.

I decided to make these adorable Kimberbell Kids Dolls.

IMG_6959


You can get the pattern at You Can Make This.  I think that this was by far the best PDF pattern that I have ever purchased.  It was very detailed and really walked you through every step of making these dolls.  These were the first dolls that I have ever made and I think that they came out pretty cute.  The only other “doll type” thing that I have ever made were the Molly Monkeys.

 IMG_6968 IMG_6969

Aren’t their faces super cute?


 IMG_7058 

I think that these faces are super cute too!  I love you girls and I am so happy that you are feeling better!  XOXOXO

Signature

Friday, January 21, 2011

Tag Baby Blanket

When my boys were born, they were each given “Taggie” Blankets.  One of my boys has become super attached to it.  He has actually now taken his brother’s “Taggie” as well and needs to go to bed with both of them.  The other day, something horrible happened!  It was time for bed and we could only find one!  Now you would think that this would be sufficient but no he has to have two.  Well lets just say that it was a bit of a fiasco.  Fortunately, my husband, who seems to be able to find anything found the missing blanket the next day.  I headed out to Joann’s for supplies to make extra blankets to avoid this happening ever again.


IMG_6953

There are many tutorials out there for these.  I will share how I made mine.  (FYI I have heard that the “Taggie” company doesn’t take too kindly to people selling these so please be sure to make them for personal use only.)

Materials:

Fleece Fabric

Several pieces of ribbon.  ( I used both satin and grosgrain ribbon in mostly 7/8” width.)

Thread, sewing machine, etc.

IMG_6939

Cut two squares of fabric.  These should be about 12 1/2” X 12 1/2” so that your finished squares are 12”x12”.  I was being stingy and wanted to get as many squares out of 1/2 yard of fabric as possible so I cut mine 9”x9”.


IMG_6941

Cut a variety of ribbons to a length of 4”.

(Don’t cut your ribbon too long as babies tend to suck on these and they could pose a choking hazard.)


 IMG_6944

Place one of the squares right side up.  Fold the ribbon pieces in half and pin the raw edges to the edges of the square.


  IMG_6946

Place the second square on top with the wrong side up and pin.


 IMG_6947

Sew around the square using 1/4” seam allowance.  When you get to a corner make sure your needle is down, lift the pressure foot and pivot the fabric.   Continues sewing down the next side.  Be sure to leave a couple of inches open for turning.


  IMG_6953

Turn the blanket right side out through the hole you have left.  I like to use a chopstick to help turn the corners all the way out.  Topstitch around the edge of the blanket.  This will close up the hole that was left open.

Keep several on hand for emergencies!  :)


Signature

Saturday, January 15, 2011

Sew Spoiled Wristlet and Cabrio Tote Sew-a-long

Sorry that I haven’t been blogging much lately.  I have a ton of things that I have made and still need to write about.  In December we had the boys’ birthday and then Christmas to keep us busy.  Then both of my little girls had their tonsils and adenoids out this past Monday and we are still dealing with some very sad girls who don’t want to eat or drink.  Then just for extra measure, the stomach bug hit our house too.  Yikes!!!  Thankfully it is a three day weekend and that means the hubby is home to help out!  Yeah!!!

On to happier news.  During Christmas I definitely had a “go to gift”.  I made up a bunch of these Sew Spoiled Wristlets for just about everyone.

IMG_6740

Aren’t they cute?  They are super easy too and everyone loved them.  They also don’t require much fabric so they are a nice stash buster too.  If you would like to make one, you can find the pattern in Sew Spoiled’s Etsy shop.  Leah gives really clear instructions with lots of pictures. 


IMG_5727

Leah is also sponsoring a sew-a-long for her Cabrio Tote bag.  Find a link to my post about the Cabrio Tote here.  Find a link to Sew Spoiled’s Blog and the Cabrio Tote Sew-a-long info here.   You can also click on the cute little button for the Cabrio Tote Sew-a-long in my sidebar.   I am planning on joining in and you should too.  It will be lots of fun. 


IMG_6914

Here are the fabrics that I have chosen for my next Cabrio Tote.


IMG_3361

My favorite project last year was participating in Sew Spoiled’s Weekender Tote Sew-a-long.  Have fun!

Signature

Wednesday, December 29, 2010

Teacher Gifts/ Coffee Cozy/ Chocolate Dipped Oreos

O.K. I couldn’t decide on a name for this post. 

Sorry that I dropped off the radar for a little bit there.  As I’m sure all of you were too, I was super busy getting ready for Christmas.  I made some cute gifts but just ran out of time to blog about them.  Today, I will share with you a super simple teacher gift.

Can you guess what they are?

IMG_6650

Coffee Cozies!

 IMG_6660

I used this very clear tutorial from  Pink Milk and Fairycakes.

The only change that I made was to leave the opening for turning at the bottom of the cuff.  It was just easier for me.

I put the cuffs around a coffee cup and then filled the cup with a couple of packages of hot chocolate and some chocolate dipped Oreos.  Yummmm!


The girls gave the cups as teacher gifts.

The class gifts were just the baggie of dipped Oreos.

IMG_6663 

 IMG_6618

Here’s what you will need for the dipped Oreos.

Chocolate mold, Oreos, chocolate melts of various colors, a microwavable container, spoon, baggies and twist ties.


 IMG_6623

Oh yes, and one cute boy playing with his train walking around and around the table!


 IMG_6624

Melt the chocolate on 50% power for a couple of minutes and stir.

 IMG_6625IMG_6629

Pour a little into each mold and place an Oreo on top.

  IMG_6628

Cover with a little more chocolate and refrigerate for 1/2 hour or more.  That’s it!  Super Yummy!


Signature

Tuesday, December 14, 2010

Christmas Appliqué


Kiddie Kandids Christmas 2010

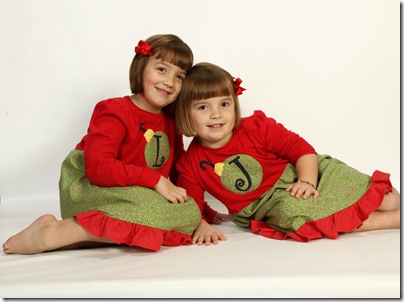
Yesterday, I posted about our Christmas pictures and how happy I am with them.  So now lets talk about the outfits.  They were super easy to make and wallet friendly too.  First I purchased red t-shirts at Wal-Mart.  The boys were $3.50 and the girls were $5.  Next stop Joann’s.  I bought about 1 1/2 yards of the green (with candy cane’s) fabric and 1/2 yard of the red polka dot fabric.  The rest of the pieces that I needed were so small that I just used up some scraps from fabric I already had.


First I appliquéd the shirts for all four.  Then I used this simple t-shirt dress pattern from Duck Soup Originals to make the girls’ shirts into dresses.  I used this pattern a lot when I was just learning how to sew.  I highly recommend it for beginners.  It is very easy and straightforward and when your done you’ve made a cute little dress.

 IMG_2447 IMG_2813 IMG_2872


O.K. so here is the low down on the appliqué.  

Materials:

Fabric for appliqué pieces

Wonder Under

Shirt to appliqué onto.

Sewing machine, thread, etc.

Scissors

Iron

Pencil


 IMG_6356

You will need one circle piece (I used a bowl to trace this.)

One yellow piece to look like the metal top of the ornament. 

One hook piece.

One initial.  I used Curlz MT in size 300 font because that is what fit on my circle piece.

Important:  Print out your appliqué pieces in reverse! 

In this case it will only make a difference for the hook piece and the letters.
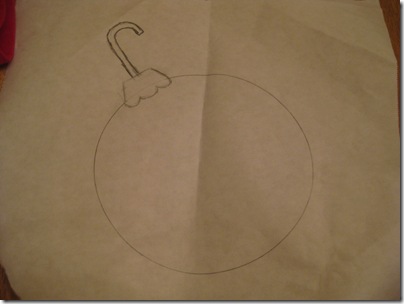
IMG_6384

Draw out your pattern first until you get the look you want.

Next trace the individual pieces onto the smooth side of some Wonder Under.


IMG_6388

Iron it onto the wrong side of your fabric.

 IMG_6391

Cut out all of your pieces.

 IMG_6359

Before you iron the pieces onto the shirt, lay everything out to make sure it looks right.
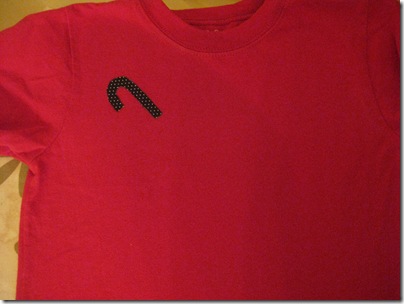
 IMG_6360

Peel off the back of the Wonder Under that is ironed onto the wrong side of your fabric pieces.  Iron down the pieces that will be on the bottom layer.  In this case, the hook was a good place to start.

 IMG_6361

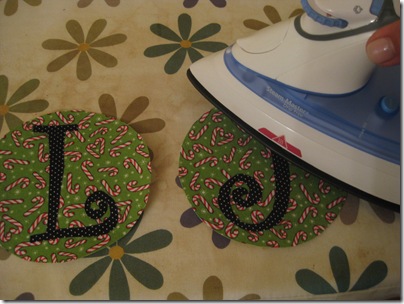
Set the stitch length on your machine to 2.0.  This will give you more control and allow you to make tiny movements without going off your fabric piece.  I use a straight stitch.  This just means that the appliqué pieces might fray a bit over time.  Feel free to use a zig zag stitch to prevent fraying.  Set the speed to slow and sew around the hook piece. 
   IMG_6393

Next, peel the back off of the letter piece and iron it onto your circle.

IMG_6396IMG_6395

Peel the backing off of the circle piece and iron it onto the shirt.

IMG_6398

I forgot to mention that it might help to turn the shirt inside out and then open it up from the bottom when sewing the pieces on.  This helps to prevent you from sewing the front of the shirt to the back of the shirt.  Sew around the letter piece and then the circle piece.  You should change the thread color each time your fabric color changes.

    IMG_6394

Finally, iron on the yellow piece and sew around it.   

You can stop at this point or use Duck Soup Original's pattern to make it into a t-shirt dress.
569038116_16-1


Signature

Friday, December 10, 2010

Christmas Pictures

I am so excited about our Christmas pictures this year!  When the girls were younger, I used to stress out so much about the pictures because I wanted them to be perfect.  Now with the boys in the mix I have just had to let it go.  I go in with absolutely no expectations and just hope that maybe we get a shot with everyone kind of looking in the direction of the camera.  Well, I have to say that I was pleasantly surprised with the end results.
See for yourself.
1291424979
1291420114_5x7
1291420068
569038116_15-1
1291420108_5x7
1291420029_5x7

Man those are cute kids!!!  Hee Hee!
I’ll be back tomorrow with a tutorial on the appliquéd shirts.
Signature

Related Posts with Thumbnails